버튼으로 만들면 간단하지만 기존에 이미 TabLayout으로 사용했던것이여서 디자인을 변경해보자

<com.google.android.material.tabs.TabLayout
    android:id="@+id/msg_input_tabLayout"
    android:layout_width="250dp"
    android:layout_height="32dp"
    app:layout_constraintLeft_toLeftOf="parent"
    app:layout_constraintTop_toTopOf="parent"
    app:tabBackground="@drawable/tab_color_selector"
    app:tabSelectedTextColor = "@color/white"
    android:layout_marginLeft="20dp"
    app:tabIndicatorHeight="0dp"
    app:tabGravity="fill"
    android:clipToPadding="false"
    app:tabRippleColor="@android:color/transparent"
    app:tabTextColor="@color/black">

    <com.google.android.material.tabs.TabItem
        android:id="@+id/tabItem1"
        android:layout_width="74dp"
        android:layout_height="32dp"
        android:background="@drawable/bg_circle_w"
        android:text="부재중"
        />
    <com.google.android.material.tabs.TabItem
        android:id="@+id/tabItem2"
        android:layout_width="122dp"
        android:layout_height="32dp"
        android:text="고객 정상 수령" />

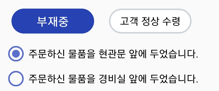
</com.google.android.material.tabs.TabLayout>

이대로 사용하면 

이런식으로 붙어서 디자이너님이 세팅한 모양이 안나온다.

for (i in 0 until binding.msgInputTabLayout.tabCount) {
    val tab = (binding.msgInputTabLayout.getChildAt(0) as ViewGroup).getChildAt(i)
    val p = tab.layoutParams as ViewGroup.MarginLayoutParams
    p.setMargins(0, 0, 50, 0)
    tab.requestLayout()
}

인터넷블로그를 열심히 뒤져 get한 코드를 넣어보자


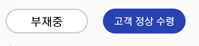
이런식으로 탭레이아웃간의 사이를 멀어지게 할 수 있다.


탭레이아웃 ui

<selector xmlns:android="http://schemas.android.com/apk/res/android">
    <item android:drawable="@drawable/success_tab_layout1" android:state_selected="true"/>
    <item android:drawable="@drawable/success_tab_layout2"/>
</selector>
<?xml version="1.0" encoding="utf-8"?>
<ripple xmlns:android="http://schemas.android.com/apk/res/android"
    android:color="@color/ripple">
    <item android:state_focused="false" android:state_pressed="false">
        <shape>
            <solid android:color="@color/color_2742B2"/>
            <stroke android:color="@color/color_2742B2"
                android:width="2dp"/>
            <corners android:radius="16dp" />
        </shape>
    </item>
</ripple>
<?xml version="1.0" encoding="utf-8"?>
<ripple xmlns:android="http://schemas.android.com/apk/res/android"
    android:color="@color/ripple">
    <item android:state_focused="false" android:state_pressed="false">
        <shape>
            <solid android:color="@color/white"/>
            <stroke android:color="@color/color_CED4DA"
                android:width="2dp"/>
            <corners android:radius="16dp" />
        </shape>
    </item>
</ripple>


switch_track_selector.xml

위에가 off 상태 아래가 on 상태

<?xml version="1.0" encoding="utf-8"?>
<selector xmlns:android="http://schemas.android.com/apk/res/android">
    <item
        android:drawable="@drawable/switch_track_off"
        android:state_checked="false"/>

    <item
        android:drawable="@drawable/switch_track_on"
        android:state_checked="true"/>

</selector>

switch_track_on.xml

on일때 

<?xml version="1.0" encoding="utf-8"?>
<shape xmlns:android="http://schemas.android.com/apk/res/android"
android:shape="rectangle">
<corners android:radius= "30dp" />

<size
    android:width="26dp"
    android:height="21dp" />

<solid android:color="#4F77E7" />
</shape>

switch_track_off.xml

off일때 

<?xml version="1.0" encoding="utf-8"?>
<shape xmlns:android="http://schemas.android.com/apk/res/android"
android:shape="rectangle">
<corners android:radius= "30dp" />

<size
    android:width="26dp"
    android:height="21dp" />

<solid android:color="#E9ECEF" />
</shape>

layout에서 switch

<Switch
    android:id="@+id/navi_save_ck"
    android:layout_width="wrap_content"
    android:layout_height="wrap_content"
    android:layout_marginRight="10dp"
    android:checked="true"
    android:layout_gravity="center"
    android:thumb="@drawable/switch_thumb"
    android:track="@drawable/switch_track_selector"
    app:switchMinWidth="51dp">

</Switch>

이쁨

아이템 사용

binding.navView.findViewById<Switch>(R.id.navi_save_ck).isChecked = viewModel.fun()
binding.navView.findViewById<Switch>(R.id.navi_save_ck).setOnCheckedChangeListener { _, b ->
    viewModel.fun()
}

원래 체크박스로 사용하던 기능을 스위치로 변경하여 만들었다.

사이즈 랑 옵션 잘사용하시길 

tmi -소요시간 2시간 (이쁘게 만들라고)

카메라로 사진을 찍고 이미지를 바로 보여줘야하는데

전체 칸이되는 layout의 크기에서 안쪽 imageView가 더 작은경우 이미지 크기에 맞게 이미지뷰가 부모뷰의 크기로 변경하는 옵션이다.


class Activity :  View.OnClickListener {

    override fun onClick(v: View?) {

        when(v?.id){

            binding.taskCamera01Img.id,
            binding.taskCamera02Img.id,
            binding.taskCamera03Img.id,
            binding.taskCamera04Img.id -> {
                //ImageView 부모사이즈에 맞게 크기 변경
                val params = ConstraintLayout.LayoutParams(
                    ConstraintLayout.LayoutParams.MATCH_PARENT,
                    ConstraintLayout.LayoutParams.MATCH_PARENT
                )
                v.layoutParams = params
            }
        }
    }

}


RecyclerView 의 드래그 및 드롭시 이벤트


private val mItemTouchCallback = object : ItemTouchHelper.Callback() {

//드래그드롭 이벤트가 발생하면 onMove에서 캐치된다 
//아이템의 포지션변경에 사용하고 있었다
//이쪽에서 무브할 아이템의 이미지를 변경하였다
        override fun onMove(
            recyclerView: RecyclerView,
            viewHolder: RecyclerView.ViewHolder,
            target: RecyclerView.ViewHolder
        ): Boolean {
            viewHolder.itemView.findViewById<View>(R.id.task_change_ic_ig).setBackgroundResource(R.drawable.task_item_change_icon_on)
            return mAdapter.onItemMove(viewHolder.adapterPosition, target.adapterPosition)
        }

//onSelectedChanged 와 onChildDraw 에서 actionState 를 캐치할 수 있었다 하지만..
// drag 시에만 포착이 되고 idle 시에는 포착이 불가능했다 
//onSelectedChanged 는 idle(drop) 상태를 확인가능하였지만 
//viewHolder 가 null로 포착되어 뷰자체를 변경하는것이 불가능하였다
        
		override fun onSelectedChanged(viewHolder: RecyclerView.ViewHolder?, actionState: Int) {
            super.onSelectedChanged(viewHolder, actionState)
        }
//onChildDraw는 actionState 가 drag 시에만 포착이되고 idle(drop) 상태는 확인이 불가능하였다
        override fun onChildDraw(c: Canvas, recyclerView: RecyclerView, viewHolder: RecyclerView.ViewHolder, dX: Float, dY: Float, actionState: Int, isCurrentlyActive: Boolean) {
            super.onChildDraw(c, recyclerView, viewHolder, dX, dY, actionState, isCurrentlyActive)
        }

//여기저기 뒤져본 결과 clearView에서는 drop 상태에서만 사용되는 이벤트였다 그냥여기에 넣어주면 
//actionState 가 0 일때와 같은 상태에서 이벤트를 넣어줄 수 있었다 
        override fun clearView(recyclerView: RecyclerView, viewHolder: RecyclerView.ViewHolder) {
            viewHolder.itemView.findViewById<View>(R.id.task_change_ic_ig).setBackgroundResource(R.drawable.task_item_change_icon)
            super.clearView(recyclerView, viewHolder)
        }

        override fun onSwiped(viewHolder: RecyclerView.ViewHolder, direction: Int) {
        }
    }


삽질 5시간의 결과물 누군가는 한번에 이 내용을 찾길...

리스트에 들어가 있는 스위치 아이템

뷰에있는 스위치의 포지션을 가지고 싶다.

하지만 어뎁터에서 액티비티로 데이터를 이동할 방법이 제공되지 않는다.

어뎁터에 인터페에이스를 따로 등록하여 가져와 보도록 하자.


엑티비티

class VhclViewActivity : BaseActivity<ActivityVhclBinding, VhclViewModel>(),VhcleAdapter.OnItemClickEventListener, VhcleCallBack {
 
    override val resId: Int = R.layout.activity_vhcl
    override val viewModel: VhclViewModel by viewModel()
    lateinit var mAdapter: VhcleAdapter
    val switchList = mutableListOf<Int>()
    override fun initView() {
        binding.vm = viewModel
    }


    override fun initBinding() {

        //TODO 임시
        val list= ArrayList<VhcleInfoDto>()
        list.add(VhcleInfoDto("1","1","1","1",0,0,"1",0,0,"1","1","1","1","1","1","1","1","1","1"))

        setRecyclerView(list)
    }


    private fun setRecyclerView(
        data: ArrayList<VhcleInfoDto>
    ) {
        mAdapter = VhcleAdapter(
            data,
            this
        )
        mAdapter.setOnItemClickListener(this)
        if (binding.vhcleRecyclerView.adapter == null) {

            binding.vhcleRecyclerView.layoutManager = LinearLayoutManager(this)
            binding.vhcleRecyclerView.adapter = mAdapter
        } else {
            binding.vhcleRecyclerView.adapter = mAdapter
        }
    }

    override fun onItemClick(position: Int,state:String) {
        //어뎁터에서 포지션값과 스위치 (on ,off) 에 따른 리스트 데이터 추가및 삭제
        if(state.equals("put"))
        switchList.add(position)
        else
        switchList.remove(position)
    }
}


어뎁터

class VhcleAdapter(
    private val dataSet: ArrayList<VhcleInfoDto>,
    private val callBack: VhcleCallBack
) : RecyclerView.Adapter<VhcleAdapter.ViewHolder>() {
    private var mItemClickListener: VhcleAdapter.OnItemClickEventListener? = null


    //customViewHolder
    class ViewHolder(
        private val binding: LayoutVhcleItemBinding,
        private val callBack: VhcleCallBack,
        private val itemClickListener: VhcleAdapter.OnItemClickEventListener?
    ) : RecyclerView.ViewHolder(binding.root) {

        private val mContext: Context = binding.root.context

        fun bind(data: VhcleInfoDto, position: Int, maxSize: Int) {

            binding.vhcleSwitch.setOnClickListener {
               if(binding.vhcleSwitch.isChecked)
               itemClickListener?.onItemClick(position,"put")
               else
               itemClickListener?.onItemClick(position,"out")

            }
        }
    }

    // Create new views (invoked by the layout manager)
    override fun onCreateViewHolder(viewGroup: ViewGroup, viewType: Int): ViewHolder {
        // Create a new view, which defines the UI of the list item
        val binding =
            LayoutVhcleItemBinding.inflate(LayoutInflater.from(viewGroup.context), viewGroup, false)
        return ViewHolder(
            binding,
            callBack,
            mItemClickListener
        )
    }
    fun setOnItemClickListener(listener: OnItemClickEventListener) {
        mItemClickListener = listener
    }
 
    override fun onBindViewHolder(viewHolder: ViewHolder, position: Int) {
        // Get element from your dataset at this position and replace the
        // contents of the view with that element
        viewHolder.bind(dataSet[position], position, itemCount)
    }

    // Return the size of your dataset (invoked by the layout manager)
    override fun getItemCount() = dataSet.size


    override fun getItemViewType(position: Int): Int {
        return position
    }

    //액티비티로 보내지는 아이템 값 얻기
    interface OnItemClickEventListener {
        fun onItemClick(position: Int,state: String)
    }

}


스위치정보를 액티비티에서 가져왔다.

'프로그래밍 > kotlin' 카테고리의 다른 글

[Kotlin] 뷰 이미지 리사이징  (0) 2023.07.13
[Kotlin] drag and drop event (드래그드롭이벤트)  (0) 2023.07.13
루팅 체크 !  (0) 2023.04.03
공용 로딩바 만들기  (0) 2023.03.20
[kotlin]내부저장소 사용하기  (0) 2023.03.17

앱 루팅을 체크해보자 


https://als2019.tistory.com/84 상당히 설명이 잘된 블로그 다음에 다시봐야겠다.

https://saltlee.tistory.com/155 여기도 정리가 잘됨 참고 

본인의 앱에서는 앱이 첫실행될때만 체크하고 있지만 참고내용을 보면 주기적으로 실행해주는게 좋다고한다 앱을 실행후 루팅을 할 수 있기 때문이다. 


fun RootChecker(){
    if(RootChecker(getContext()).isDeviceRooted()){
        Toast.makeText(this, getString(R.string.error_modulate_os), Toast.LENGTH_SHORT).show()

        moveTaskToBack(true)
        if (Build.VERSION.SDK_INT >= 21) {
            finishAndRemoveTask()
        } else {
            finish()
        }
        exitProcess(0)
    }
}


fun isDeviceRooted(): Boolean {
    return checkRootFiles() || checkSUExist() || checkRootPackages()
}


1. 루팅파일 체크 

private fun checkRootFiles(): Boolean {
    for (path in rootFiles) {
        try {
            if (File(path).exists()) {
                return true
            }
        } catch (e: RuntimeException) {

        }
    }
    return false
}

 private val rootFiles = arrayOf(
        "/system/app/Superuser.apk",
        "/sbin/su",
        "/system/bin/su",
        "/system/xbin/su",
        "/system/usr/we-need-root/",
        "/data/local/xbin/su",
        "/data/local/bin/su",
        "/system/sd/xbin/su",
        "/system/bin/failsafe/su",
        "/data/local/su",
        "/su/bin/su",
        "/su/bin",
        "/system/xbin/daemonsu"
    )


2. 루팅 os 체크

private fun checkSUExist(): Boolean {
    var process: Process? = null
    val su = arrayOf("/system/xbin/which", "su")
    try {
        process = runtime.exec(su)
        BufferedReader(
            InputStreamReader(
                process.inputStream,
                Charset.forName("UTF-8")
            )
        ).use { reader -> return reader.readLine() != null }
    } catch (e: IOException) {

    } catch (e: Exception) {

    } finally {
        process?.destroy()
    }
    return false
}

    private val runtime by lazy {
        Runtime.getRuntime()
    }


3. 루팅 패키지 체크

private fun checkRootPackages(): Boolean {
    val pm = context.packageManager
    if (pm != null) {
        for (pkg in rootPackages) {
            try {
                pm.getPackageInfo(pkg, 0)
                return true
            } catch (ignored: PackageManager.NameNotFoundException) {
                // fine, package doesn't exist.
            }
        }
    }
    return false
}


    private val rootPackages = arrayOf(
        "com.devadvance.rootcloak",
        "com.devadvance.rootcloakplus",
        "com.koushikdutta.superuser",
        "com.thirdparty.superuser",
        "eu.chainfire.supersu",
        "de.robv.android.xposed.installer",
        "com.saurik.substrate",
        "com.zachspong.temprootremovejb",
        "com.amphoras.hidemyroot",
        "com.amphoras.hidemyrootadfree",
        "com.formyhm.hiderootPremium",
        "com.formyhm.hideroot",
        "com.noshufou.android.su",
        "com.noshufou.android.su.elite",
        "com.yellowes.su",
        "com.topjohnwu.magisk",
        "com.kingroot.kinguser",
        "com.kingo.root",
        "com.smedialink.oneclickroot",
        "com.zhiqupk.root.global",
        "com.alephzain.framaroot"
    )


로딩바 xml 만들기

<?xml version="1.0" encoding="utf-8"?>
<androidx.constraintlayout.widget.ConstraintLayout xmlns:android="http://schemas.android.com/apk/res/android"
    xmlns:app="http://schemas.android.com/apk/res-auto"
    android:layout_width="match_parent"
    android:layout_height="match_parent">

    <ProgressBar
        android:id="@+id/progress"
        android:layout_width="40dp"
        android:layout_height="40dp"
        android:textSize="50px"
        app:layout_constraintBottom_toBottomOf="parent"
        app:layout_constraintLeft_toLeftOf="parent"
        app:layout_constraintRight_toRightOf="parent"
        app:layout_constraintTop_toTopOf="parent" />

    <TextView
        android:id="@+id/text"
        android:layout_width="wrap_content"
        android:layout_height="wrap_content"
        android:layout_below="@id/progress"
        android:textColor="@color/white"
        app:layout_constraintLeft_toLeftOf="@id/progress"
        app:layout_constraintRight_toRightOf="@id/progress"
        app:layout_constraintTop_toBottomOf="@id/progress" />
</androidx.constraintlayout.widget.ConstraintLayout>

로딩다이얼로그 만들기

object LoadingDialog {
    var dialog: Dialog? = null //obj
    fun displayLoadingWithText(context: Context?, text: String?, cancelable: Boolean) {
        dialog!!.requestWindowFeature(Window.FEATURE_NO_TITLE)
        dialog!!.setContentView(R.layout.layout_loding)
        dialog!!.window!!.setBackgroundDrawable(ColorDrawable(Color.TRANSPARENT))
        dialog!!.setCancelable(cancelable)
        val textView = dialog!!.findViewById<TextView>(R.id.text)
        textView.text = text
        try {
            dialog!!.show()
        } catch (e: Exception) {
        }
    }

    fun hideLoading() {
        try {
            if (dialog != null) {
                dialog!!.dismiss()
            }
        } catch (e: Exception) {
        }
    }
}

사용하기

override fun showLoading(cancelable: Boolean) {
    hideLoading()
    LoadingDialog.displayLoadingWithText(this, resources.getString(R.string.network_wait),cancelable)
}
override fun hideLoading() {
    LoadingDialog.hideLoading()
}

1. 내부저장소 권한 등록하기

<uses-permission android:name="android.permission.WRITE_EXTERNAL_STORAGE" />        <!-- 내부저장소 권한 -->
<uses-permission android:name="android.permission.READ_EXTERNAL_STORAGE" />         <!-- 내부저장소 권한 -->

내부저장소는 사용자의 권한요청을 할 필요가 없습니다.

참고 : https://developer.android.com/training/data-storage?hl=ko


2. 내부저장소 파일 만들기

fun create(context){
    val filename = "파일명"
    val dir = context.filesDir
    val file = File(dir, filename)
    
    if (!file.exists() && !file.isDirectory) {
        file.createNewFile()  
    }
}

3.  내용 저장하기

fun write(context: Context, msg: String) {
    val msgBuiler = StringBuilder()

    msgBuiler.append('{')
        .append("\"item\" : " + data.getString("key")!!+ ",")
        .append("},")
        
   try {
            val filename = "파일명"
            val fileContents = msgBuiler.toString()
            context.openFileOutput(filename, Context.MODE_APPEND).use {
                it.write(fileContents.toByteArray())
                it.flush()
                it.close()
            }
    } 
    catch (e: Exception) {
        e.printStackTrace()
  	}     
}

4. 내용 지우기

fun clear(context: Context) {
    try {
        val filename = "파일명"
        val fileContents = ""
        context.openFileOutput(filename, Context.MODE_PRIVATE).use {
            it.write(fileContents.toByteArray())
            it.flush()
            it.close()
        }
    } catch (e: Exception) {
        e.printStackTrace()
    }
}

5. 파일 읽어오고 싶을때

fun accessFileUsingStream(context: Context): String {
    val filename = "파일명"
    val ff = context.getFileStreamPath(filename)
    val file: File = File("" + ff)
    if (file.exists()) {
        context.openFileInput(filename).bufferedReader().useLines { lines ->
            lines.fold("") { some, text ->
                "$some\n$text"
            }
        }
        if (context.openFileInput(filename).bufferedReader().readText().isNullOrBlank()) {
            return ""
        }
        var text: String
        text = context.openFileInput(filename).bufferedReader().readText()
        return text
    } else {
        return ""
    }
}

'프로그래밍 > kotlin' 카테고리의 다른 글

루팅 체크 !  (0) 2023.04.03
공용 로딩바 만들기  (0) 2023.03.20
리사이클러뷰 뷰가 꼬일때  (0) 2023.01.05
[kotlin]Handler deprecated  (0) 2022.11.10
[kotlin]locationRequest Deprecated  (0) 2022.11.10

+ Recent posts